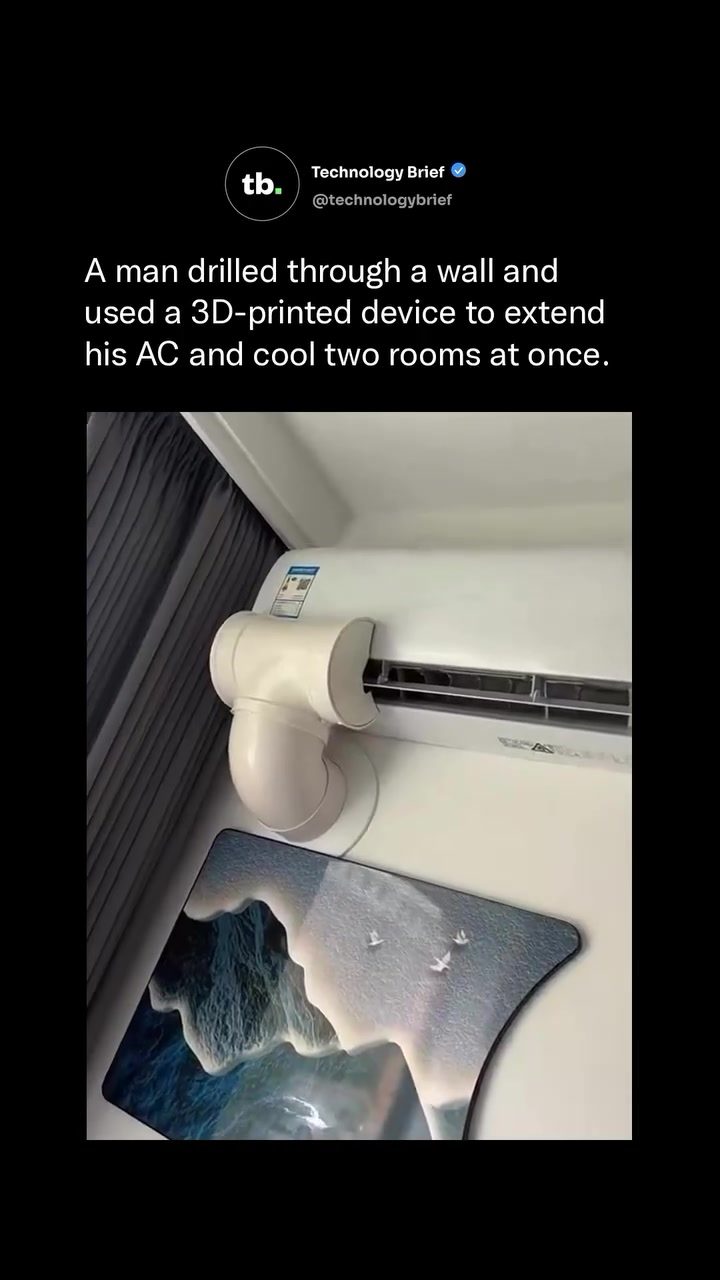
DIY AC Extension for Cooling Two Rooms
Extending the cooling capacity of a single air conditioning unit to serve two rooms is a clever and cost-effective solution. With a custom wall adapter and a simple DIY approach, you can achieve a more comfortable living space without the need for an additional AC unit. This approach involves drilling a hole through a wall and using a curved pipe to route the airflow from one room to another. This article delves into the specifics of this DIY project, providing practical tips and insights to help you replicate the setup successfully.
Context / Why This Matters
During the hot summer months, maintaining a cool and comfortable home environment is crucial. Traditional air conditioning units are designed to cool a single room efficiently. However, installing multiple units can be expensive and impractical, especially for smaller living spaces. By extending the cooling capacity of a single unit to cover two rooms, homeowners can significantly reduce their energy costs and maximize the efficiency of their existing cooling system.
Main Discussion
The Basics of the DIY AC Extension
The process involves several key components: a single air conditioner, a custom wall adapter, and a curved pipe. The adapter, in this case, is a 3D-printed device branded Leocher, which fits over a circular wall vent. This adapter channels the airflow from the AC’s drainage port into the adjacent room, effectively cooling two spaces simultaneously. The curved pipe helps route the cold air through the wall, ensuring a seamless flow of cool air.
How a Curved Pipe Works
A curved pipe is essential for routing the airflow from the AC unit to the adjacent room. This pipe is designed to fit snugly into the hole drilled through the wall and connect the two rooms. The curvature ensures that the airflow is not obstructed and maintains a steady stream of cool air. The pipe is typically made of a durable, flexible material that can withstand the pressure and temperature changes associated with air conditioning.
The Role of a Custom Wall Adapter
A custom wall adapter, like the Leocher, is a crucial component in this DIY project. The adapter fits over a circular wall vent and channels the airflow from the AC’s drainage port into the next room. This adapter is designed to be simple and effective, allowing for a straightforward installation process. It eliminates the need for complex wiring or additional power sources, making it a cost-effective solution.
Drilling the Wall for the Extension
Drilling a hole through the wall is a critical step in this DIY project. The hole should be large enough to accommodate the curved pipe and ensure a smooth flow of air. It is essential to choose a location for the hole that provides optimal airflow and minimizes any potential obstructions. Additionally, it is crucial to ensure that the wall’s structural integrity is not compromised during the drilling process.
Testing the Cooling Effect
One of the simplest ways to test the cooling effect of the extended AC unit is by holding a piece of tissue paper near the vent. If the paper flutters visibly, it indicates that cold air is pushing through, confirming the effectiveness of the DIY solution. This test is a quick and reliable method to ensure that the setup is working as intended.
Practical Tips
Choosing the Right Air Conditioner
Selecting the right air conditioner for this DIY project is crucial. Opt for a unit with a drainage port that can be easily connected to the custom wall adapter. The Haier air conditioner, for instance, is a suitable choice as it runs at a comfortable 26°C and has a drainage port that can be effectively utilized.
Ensuring a Proper Fit
When installing the custom wall adapter and the curved pipe, ensure that they fit snugly into the hole and that the airflow is not obstructed. Any gaps or misalignments can reduce the efficiency of the cooling system. Use sealants or insulation materials to secure the components in place and prevent any air leakage.
Seeking Professional Help
While this DIY project is relatively simple, seeking professional help is advisable if you are unsure about any aspect of the installation. A professional can ensure that the wall drilling and component installation are done correctly, minimizing the risk of any structural damage or airflow obstructions. Additionally, a professional can provide expert advice on the best materials and techniques to use.
Important Takeaways
- Extending the cooling capacity of a single air conditioner to two rooms is a cost-effective and practical solution for maintaining a comfortable home environment.
- The DIY project involves drilling a hole through a wall, using a custom wall adapter, and a curved pipe to route the airflow from the AC unit to the adjacent room.
- The Leocher adapter and a Haier air conditioner are suitable choices for this project, ensuring a seamless and efficient cooling setup.
- Testing the cooling effect with a piece of tissue paper is a simple and reliable method to confirm the effectiveness of the DIY solution.
- Seeking professional help can ensure a proper installation and minimize any potential risks.
Conclusion
Extending the cooling capacity of a single air conditioner to multiple rooms is a feasible and cost-effective solution. With the right materials and a straightforward DIY approach, you can achieve a more comfortable living space without the need for additional cooling units. This article provides practical insights and tips to help you successfully replicate the setup, ensuring optimal cooling efficiency and comfort.
Watch the Reel
Questions readers ask
Can I use any 3D printer to create the wall adapter for my DIY AC extension?
While most 3D printers can handle this task, ensure your printer can manage the size and complexity of the wall adapter design. Using a printer with good layer resolution will guarantee a better seal and airflow. For optimal results, use a printer with a build volume of at least 200 x 200 x 200 mm.
What type of air conditioning units work best with this DIY AC extension?
Wall-mounted air conditioning units are the most compatible with this setup. Window units can also work, but you might need to adjust the design of the 3D-printed adapter. Ensure your unit has enough power to cool two rooms effectively.
What materials do I need for the 3D-printed wall vent?
For the 3D-printed wall vent, you will need a 3D printer, PLA or ABS filament, and design software to create the adapter. Use a filament with good durability and heat resistance, as the adapter will be exposed to airflow from the AC unit. PLA is typically sufficient, but ABS may offer better heat resistance.
How do I ensure a proper seal around the wall-mounted AC?
To ensure a proper seal, use weatherstripping or foam tape around the 3D-printed adapter. This will prevent airflow leakage and maximize cooling efficiency. Additionally, apply caulk around the exterior of the vent to protect against drafts and pests.
Can I extend the AC to more than two rooms using this method?
While it's possible to extend the AC to more rooms, the cooling efficiency will decrease with each additional room. It's best to start with two rooms and assess the performance. If needed, consider using additional cooling methods or upgrading to a more powerful AC unit for better results.
How can I maximize the cooling efficiency of my DIY AC extension?
To maximize cooling efficiency, ensure the airflow path is straight and unobstructed. Regularly clean the AC unit and the 3D-printed adapter to remove any dust or debris. Additionally, use a programmable thermostat to optimize cooling times and reduce energy costs.
What safety precautions should I take when drilling through the wall for the AC extension?
Before drilling, locate any hidden wires, pipes, or structural components using a stud finder or wall scanner. Wear protective gear, including goggles and gloves. Ensure the area is well-ventilated, and always turn off power to the area you will be drilling in.
Related deep dives
Similar reads based on topic and creator.




Recent articles
Fresh deep dives from the latest Reels we unpacked.



Comments
Be the first to comment.