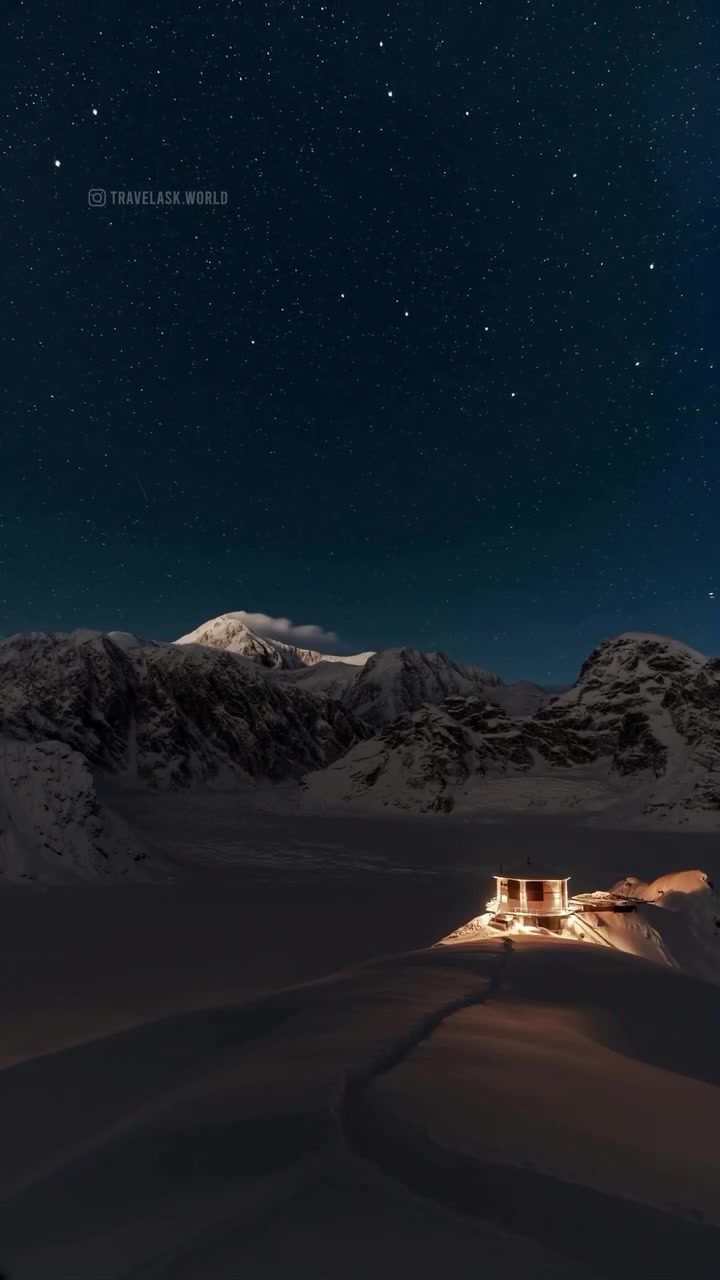
Mountain Landscape Timelapse
Witnessing a mountain landscape transition through time is a breathtaking experience. Timelapse videos condense hours or even days into a few minutes, revealing the dynamic beauty of nature. The timelapse showcases a snowy mountain landscape, featuring a building illuminated against a starry night sky and snow-covered mountains. The subsequent frames display a cloudy sky, the aurora borealis, and star trails, all highlighting the natural environment's beauty.
The Magic of Timelapse
Timelapse photography is a technique that involves taking a series of photographs at set intervals and then compiling them into a video. This method allows viewers to see processes that occur over extended periods in a condensed format. For instance, the timelapse of a mountain landscape can show the movement of clouds, the changing positions of stars, and the appearance of the aurora borealis, all within a short video.
How It’s Done
Creating a timelapse involves several steps:
-
Planning and Scouting: Choose a location with a clear view of the sky and interesting foreground elements, such as mountains or buildings. Ensure the spot is safe and accessible, especially in remote or snowy regions.
-
Equipment Setup: Use a sturdy tripod to keep the camera steady and a remote shutter or intervalometer to take photos at regular intervals. A wide-angle lens can capture more of the scene, and a weather-sealed camera can withstand harsh conditions.
-
Camera Settings: Set the camera to manual mode to maintain consistent exposure throughout the shoot. Use a low ISO to minimize noise, a narrow aperture for depth of field, and a moderately slow shutter speed to capture motion.
-
Interval Timing: The interval between shots depends on the desired effect. For star trails, intervals of 15-30 seconds are common, while for cloud movements, intervals of 1-5 minutes are typical.
-
Post-Processing: After shooting, transfer the images to a computer and use software like Adobe Lightroom or Photoshop to edit them. Adjust exposure, contrast, and white balance to enhance the final video. Compile the images into a video using timelapse software or video editing tools.
Why This Matters
Timelapse videos of mountain landscapes serve multiple purposes, from scientific documentation to artistic expression. They provide a unique perspective on natural phenomena, capturing the slow changes that are often overlooked in everyday life.
Scientific Documentation
Timelapse photography can document natural processes such as cloud movements, star trails, and the aurora borealis. These phenomena are often fleeting and hard to capture in real time. The timelapse technique allows researchers to study these processes in detail, providing valuable data for meteorological and astrophysical studies.
Artistic Expression
Beyond scientific applications, timelapse videos are a form of artistic expression. They transform mundane scenes into dynamic and captivating visuals, revealing the beauty in everyday elements. The contrast between the stillness of a mountain landscape and the movement of celestial bodies creates a mesmerizing effect, drawing viewers into a meditative state.
Inspiration for Travel and Adventure
Timelapse videos often inspire viewers to explore the natural world. They showcase the beauty of remote locations, encouraging people to visit and experience these places firsthand. Such videos can motivate travelers to venture off the beaten path, discovering hidden gems and breathtaking landscapes.
Engagement on Social Media
On platforms like TRAVELASK.WORLD, timelapse videos garner significant attention. They are highly shareable and engaging, often sparking conversations about travel, nature, and photography. These videos can inspire others to take up photography, explore new destinations, or simply appreciate the wonders of the natural world.
Practical Tips for Capturing a Mountain Landscape Timelapse
Creating a stunning mountain landscape timelapse requires careful planning and execution. Here are some practical tips to help you get started:
1. Choose the Right Location
Select a spot with a clear view of the sky and interesting foreground elements. Mountains, buildings, and bodies of water can add depth and context to your timelapse. Ensure the location is safe and accessible, especially in remote or snowy regions.
2. Use a Sturdy Tripod
A sturdy tripod is essential for keeping your camera steady throughout the shoot. Invest in a high-quality tripod that can withstand wind and other environmental factors. Use a remote shutter or intervalometer to avoid camera shake during long exposures.
3. Set Consistent Camera Settings
Use manual mode to maintain consistent exposure throughout the shoot. A low ISO will minimize noise, a narrow aperture will provide depth of field, and a moderately slow shutter speed will capture motion. Keep these settings consistent to avoid jarring changes in the final video.
4. Plan for Weather Conditions
Be prepared for changing weather conditions, especially in snowy or mountainous regions. Dress appropriately and ensure your equipment can withstand the elements. Consider using a weather-sealed camera and protective gear for your lens and tripod.
5. Post-Process Carefully
After shooting, transfer your images to a computer and use software like Adobe Lightroom or Photoshop to enhance them. Adjust exposure, contrast, and white balance to create a cohesive look. Compile the images into a video using timelapse software or video editing tools, ensuring smooth transitions between frames.
Important Takeaways
Mountain landscape timelapse videos offer a unique perspective on the natural world, showcasing the beauty of remote locations and the dynamics of celestial phenomena. They serve both scientific and artistic purposes, inspiring viewers to explore and appreciate the wonders of nature. By following practical tips and investing in the right equipment, anyone can create captivating timelapse videos that highlight the stunning beauty of mountain landscapes.
Conclusion
Timelapse videos of mountain landscapes captivate audiences with their dynamic and mesmerizing visuals. They reveal the beauty of natural phenomena, inspire travel and adventure, and provide valuable data for scientific research. Whether you're a photographer, a scientist, or a travel enthusiast, timelapse videos offer a unique way to experience and document the natural world. Embrace the magic of timelapse photography and uncover the hidden beauty of mountain landscapes.
Watch the Reel
Questions readers ask
What equipment is typically required to create a snowy mountain timelapse like the one featured?
To create a snowy mountain timelapse, you'll need a DSLR or mirrorless camera with manual controls, a sturdy tripod to keep the camera steady, and an intervalometer to set the shooting intervals. Additionally, weather-resistant gear and a remote shutter release can be helpful for cold and snowy conditions.
How long does it take to create a timelapse of the northern lights?
The duration to create a northern lights timelapse can vary greatly. It depends on the frequency of the aurora's appearances and the desired length of the final video. Typically, intervals of 20-30 seconds between shots are used, and the timelapse can range from a few hours to several nights of shooting.
Are there specific settings for a starry night mountain timelapse?
For a starry night timelapse, use a wide aperture (low f-number) to allow more light in, a low ISO to reduce noise, and a long shutter speed to capture the stars. A common starting point is f/2.8, ISO 1600, and 30 seconds exposure, but adjustments may be needed based on your specific camera and lighting conditions.
Can timelapse videos capture the movement of clouds over snowy mountains?
Yes, timelapse videos are excellent for capturing cloud movement over snowy mountains. By setting a suitable interval between shots, you can condense hours of cloud movement into a short, mesmerizing video. This technique highlights the dynamic nature of the landscape and the ever-changing sky.
What are star trails, and how are they captured in a night sky timelapse?
Star trails are the visible paths that stars take across the night sky due to the Earth's rotation. To capture star trails in a timelapse, use long exposures (e.g., 30 seconds to several minutes) and layer the images together. This technique creates a mesmerizing display of concentric circles around the North Star.
How can I ensure my camera stays warm in cold conditions while filming a snowy landscape timelapse?
To keep your camera warm in cold conditions, use insulated camera covers and hand warmers placed near the camera body. Additionally, keep spare batteries warm, as cold temperatures can drain them quickly. Using a weather-sealed camera can also help protect your gear from moisture and extreme temperatures.
What software can I use to compile my timelapse images into a video?
There are several software options available to compile timelapse images into a video. Adobe Lightroom, Adobe Premiere Pro, and LRTimelapse are popular choices. Each offers unique features for processing and compiling your timelapse sequences, allowing you to create a seamless and visually appealing video.
Related deep dives
Similar reads based on topic and creator.

Recent articles
Fresh deep dives from the latest Reels we unpacked.


Comments
Be the first to comment.