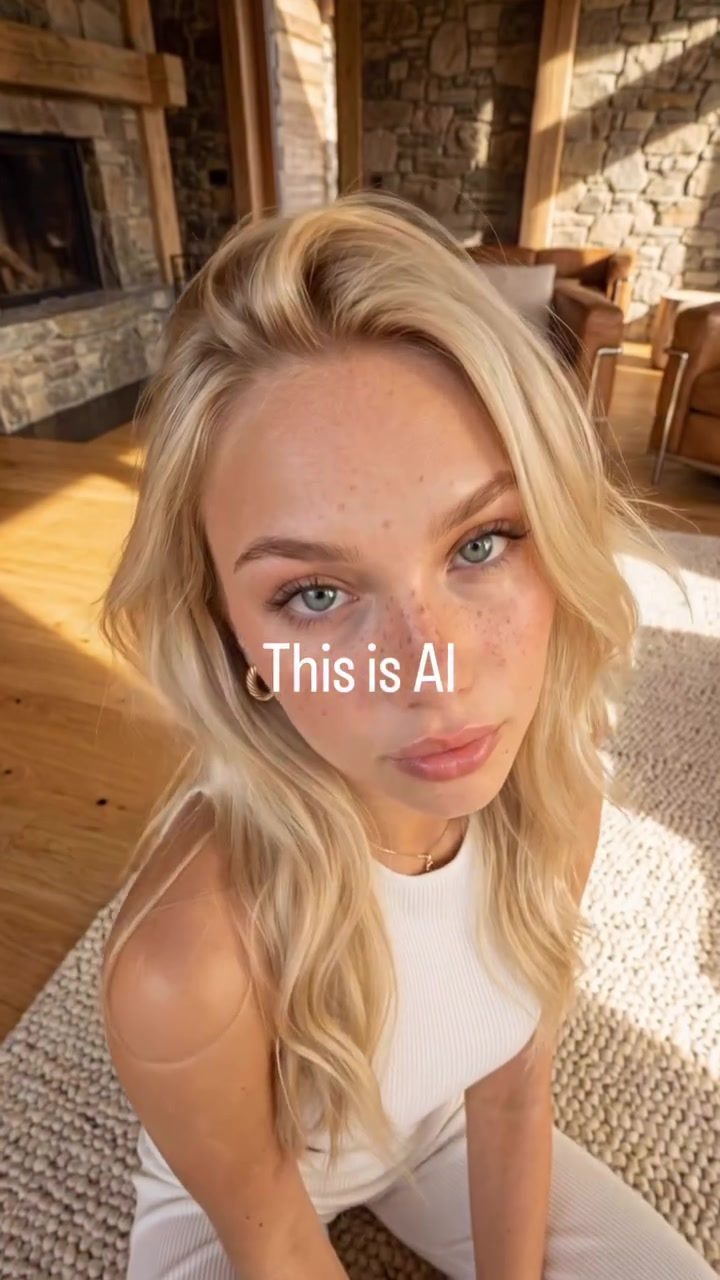
Mastering AI Skin Filters for Enhanced Skin Texture
AI skin filters have become a game-changer in the beauty industry, offering a way to achieve flawless, '4K' skin texture with ease. These advanced tools use artificial intelligence to smooth out imperfections, even out skin tone, and create a natural, radiant complexion. Whether you're a professional photographer, a content creator, or simply someone looking to enhance your selfies, understanding and mastering AI skin filters can significantly elevate your results.
Context / Why This Matters
In today's visually driven world, the demand for perfect skin has never been higher. From social media influencers to professional photographers, everyone is seeking ways to achieve that flawless, airbrushed look. AI skin filters provide a solution that is both efficient and effective, allowing users to enhance skin texture without the need for extensive retouching or editing skills. This technology is particularly useful for portrait photographers, beauty bloggers, and anyone who wants to ensure their subjects look their best in photos and videos.
Main Discussion
The Magic of '4K Skin' Effect
The '4K skin' effect is a term often used to describe the ultra-smooth, high-definition skin texture that AI filters can achieve. This effect is characterized by its natural, almost photorealistic quality, making it difficult to distinguish between what is real and what has been enhanced. The key to achieving this effect lies in the AI algorithms that analyze and enhance skin texture, reducing imperfections and enhancing overall complexion.
The process involves several steps. Firstly, the AI detects the skin areas in the image or video. It then analyzes the texture, identifying imperfections such as blemishes, pores, and uneven skin tone. Once identified, the AI applies various filters and adjustments to smooth out these imperfections, creating a seamless and natural look. This is how AI-powered skin filters manage to achieve that coveted '4K skin' effect.
Workflow for Achieving Similar Results
Using AI skin filters effectively involves more than just applying a filter and hoping for the best. There are several steps and best practices to follow to ensure you get the most out of these tools.
Step 1: Choose the Right Tool
There are numerous AI skin filters available, each with its own set of features and capabilities. Some popular options include various apps and software plugins that offer skin smoothing and enhancement features. When choosing a tool, consider factors such as ease of use, customization options, and compatibility with your existing workflow.
Step 2: Lighting and Setting
Lighting plays a crucial role in how skin texture appears in photos and videos. For the best results, use natural lighting or soft, diffused artificial light. This helps to minimize harsh shadows and highlights, making it easier for the AI to detect and enhance skin texture. The cozy cabin setting, as seen in some demonstrations, is a great example of how natural lighting can complement the AI skin filter's capabilities.
Step 3: Apply the Filter
Once you've chosen your tool and set up your lighting, it's time to apply the filter. Most AI skin filters offer a range of customization options, allowing you to adjust the intensity of the effect, the areas of the skin to be enhanced, and other parameters. Experiment with these settings to find the look that works best for your subject.
Step 4: Review and Adjust
After applying the filter, take a step back and review the results. Look for areas that may need further adjustment, such as edges that may have become too blurred or skin tones that appear unnatural. Most AI skin filters allow for fine-tuning, so don't be afraid to make additional adjustments as needed.
Step 5: Save and Share
Once you're happy with the results, save your work and share it with the world. Whether you're posting on social media, sharing with clients, or using the images in a professional project, your enhanced photos and videos are sure to impress.
Tips for Enhancing Skin Texture
Enhancing skin texture with AI filters doesn't have to be complicated. Here are a few tips to help you get the best results:
- Start with a Good Base: The better the original image or video, the better the results you'll get from the AI filter. Make sure your subject has good skin care and is well-prepared for the shoot.
- Use Natural Light: As mentioned earlier, natural lighting can make a big difference in how skin texture appears. Whenever possible, use natural light or soft, diffused artificial light for your shoots.
- Experiment with Settings: Don't be afraid to experiment with the settings and parameters of your AI filter. Each subject's skin is unique, and what works for one person may not work for another.
- Review and Adjust: Always take the time to review your work and make any necessary adjustments. Small tweaks can make a big difference in the final result.
Common Challenges and Solutions
While AI skin filters offer numerous benefits, they are not without their challenges. Here are a few common issues and solutions to help you overcome them:
- Over-Smoothing: One of the most common issues with AI skin filters is over-smoothing, where the skin appears too perfect and unnatural. To avoid this, start with a lower intensity setting and gradually increase it until you achieve the desired effect.
- Unnatural Skin Tone: In some cases, AI filters can alter skin tones, making them appear unnatural or unflattering. To avoid this, pay close attention to the skin tone settings and make any necessary adjustments to ensure a natural look.
- Edges and Boundaries: AI filters can sometimes struggle with edges and boundaries, particularly around the hairline, jawline, and areas where the skin meets other surfaces. To address this, use masking tools or manual adjustments to refine these areas and ensure a seamless look.
Practical Tips
Consistent Lighting
Consistent lighting is crucial for achieving the best results with AI skin filters. Natural light or soft, diffused artificial light can help to minimize shadows and highlights, making it easier for the AI to detect and enhance skin texture.
Experiment with Settings
AI skin filters offer a range of customization options. Don't be afraid to experiment with these settings to find the look that works best for your subject. Adjust the intensity, skin tone, and other parameters as needed to achieve the desired effect.
Regular Practice
Like any skill, mastering AI skin filters takes practice. The more you use these tools, the better you'll become at achieving the desired results. Don't be discouraged if your first few attempts don't turn out as expected. Keep practicing, and you'll soon be creating stunning, flawless skin textures.
Important Takeaways
Mastering AI skin filters can significantly enhance the quality of your photos and videos. By understanding the technology, choosing the right tools, and following best practices, you can achieve a natural, radiant complexion that impresses your audience and clients. Remember to start with good lighting, experiment with settings, and always review and adjust your work for the best results.
Conclusion
AI skin filters have revolutionized the beauty industry, providing a powerful tool for enhancing skin texture and achieving a flawless, natural look. Whether you're a professional photographer, a content creator, or simply someone looking to elevate your selfies, mastering these filters can make a world of difference. By following the steps and tips outlined in this guide, you'll be well on your way to creating stunning, high-definition skin textures that wow your audience.
Watch the Reel
Questions readers ask
What is 4K skin texture and how do AI skin filters achieve it?
4K skin texture refers to an exceptionally smooth and clear complexion, akin to the high resolution of a 4K display. AI skin filters achieve this by using advanced algorithms to detect and minimize imperfections such as blemishes, wrinkles, and uneven tone, resulting in a natural, radiant finish.
Are there any free AI beauty tools available for enhancing skin texture?
Yes, there are several free AI beauty tools that can help enhance skin texture. Many photo editing apps and online platforms offer AI-powered skin filters that can smooth out imperfections and improve skin tone without any cost. Examples include apps like FaceApp and BeautyPlus, which provide basic AI beauty enhancement features for free.
How can AI skin filters benefit professional photographers?
AI skin filters can greatly benefit professional photographers by streamlining the retouching process. These tools can quickly and efficiently reduce imperfections, even out skin tone, and enhance the overall quality of portraits. This not only saves time but also ensures a consistent and natural-looking finish across all images.
What are some common challenges when using AI skin filters?
Some common challenges include over-smoothing, which can result in an unnatural, plastic-like appearance, and difficulties in achieving consistent results across different skin types and lighting conditions. Additionally, some users may struggle with finding the right balance between enhancement and authenticity, maintaining a natural look while improving skin texture.
How can I get started with AI beauty enhancement tools?
To get started, explore various AI beauty tools and apps to find one that suits your needs. Many offer tutorials or guides to help you understand their features. Experiment with different settings and filters to see what works best for your skin type and preferred style. Joining online communities and forums can also provide valuable tips and support.
What are some tips for using AI skin filters effectively?
To use AI skin filters effectively, start with a high-quality image and apply the filter with a light touch. Adjust the settings to retain natural features while minimizing imperfections. Regularly compare the edited image with the original to ensure you're not over-processing the skin. Save your edits in layers so you can go back and tweak the settings without losing your original work.
Why is the AI beauty community important for learning about AI skin filters?
The AI beauty community is a valuable resource for learning about the latest tools and techniques. Engaging with this community can provide you with insights, tips, and feedback from others who are also mastering AI skin filters. You can find tutorials, share your work, and get constructive criticism to improve your skills.
Related deep dives
Similar reads based on topic and creator.




Recent articles
Fresh deep dives from the latest Reels we unpacked.




Comments
Be the first to comment.