Car Modification with Protective Film
Applying a protective film to a car's exterior is a popular modification technique that enhances both the aesthetic appeal and the durability of the vehicle. This process involves carefully installing a clear film to protect the car's paint from scratches, chips, and other forms of damage. This guide will walk you through the key aspects of this modification, focusing on the specific techniques used on a BMW.
Why This Matters
Protective film applications are crucial for maintaining the resale value and overall appearance of a car. By shielding the paint from everyday hazards, such as road debris and weathering, the film helps keep the car looking newer for longer. This modification is particularly beneficial for high-end vehicles like BMWs, where the exterior finish is a significant selling point.
Main Discussion
Understanding Protective Film
Protective film, also known as paint protection film (PPF), is a transparent, urethane material designed to shield a car's paint from external damage. It is commonly applied to high-impact areas such as the hood, windshield, and side mirrors. The film is virtually invisible once applied, allowing the car's original color and finish to shine through while providing an extra layer of protection.
Application Process
The application of protective film involves several steps, each requiring precision and care to ensure a flawless finish.
Preparation
Before applying the film, the car's surface must be thoroughly cleaned and prepared. This includes:
- Washing and Drying: The car is washed with a gentle soap and water solution to remove dirt and contaminants. It is then dried completely to prevent any water spots.
- Degreasing: A degreaser is used to remove any oily residues that could interfere with the film's adhesion.
- Tape and Masking: Areas where the film will not be applied are taped off to protect them from accidental contact with the adhesive.
Installation
The installation process itself is where the real craftsmanship comes into play. Here’s a breakdown of the key steps:
- Cutting the Film: The protective film is custom-cut to fit the specific contours of the car's hood and windshield. This step requires precise measurements and cutting techniques to ensure a perfect fit.
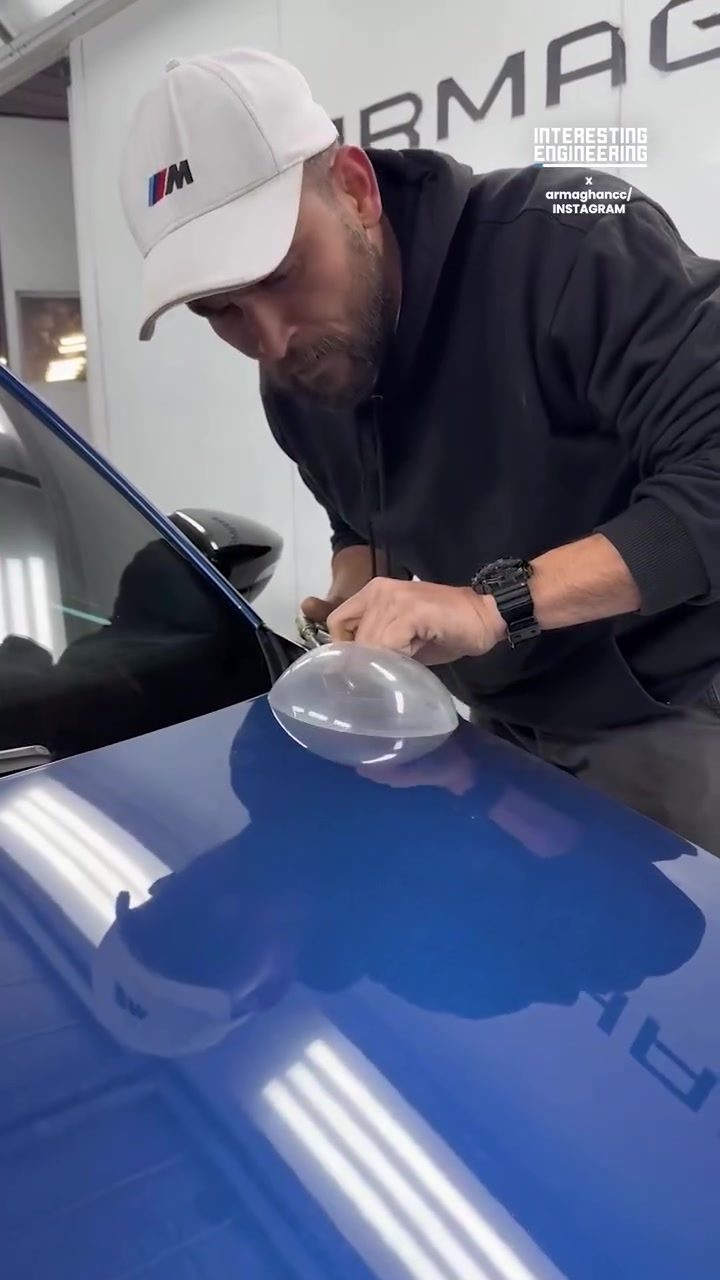
- Applying the Film: The film is carefully laid onto the car's surface. An inflatable bladder is used to lift the film from the hood by building separation from underneath. This technique helps to eliminate any air bubbles and ensures a smooth, even application.
- Squeegeeing: A squeegee is used to apply pressure and remove any remaining air pockets. This step is crucial for achieving a seamless finish.
- Final Adjustments: Any remaining edges or excess film are trimmed away, and the film is allowed to cure for a specified period to ensure proper adhesion.
Techniques Demonstrated
The technique of using an inflatable bladder to lift the film from the hood is particularly noteworthy. This method involves inflating a bladder underneath the film, which creates a gentle separation from the surface. This allows for easier positioning and adjustment of the film before it is fully adhered. The process is completed by carefully peeling the film while applying pressure to ensure it conforms perfectly to the car's contours.
Tools and Materials
Several tools and materials are essential for this process:
- Protective Film: High-quality urethane film designed for automotive applications.
- Inflatable Bladder: A device used to create a separation between the film and the car's surface.
- Squeegee: A tool used to apply pressure and remove air bubbles.
- Cutting Tools: Precision cutting tools for trimming the film to the exact size and shape.
- Cleaning Solutions: Gentle soaps, degreasers, and other cleaning agents to prepare the surface.
Practical Tips
Choosing the Right Film
Selecting the right protective film is crucial. Look for films that are:
- Clear: Opt for a film that is virtually invisible once applied.
- Durable: Ensure the film is resistant to scratches, UV rays, and weathering.
- Easy to Install: Choose a film that is designed for DIY installation if you plan to do it yourself.
Maintenance
Regular maintenance is key to extending the life of the protective film. This includes:
- Regular Washing: Wash the car regularly with a gentle soap and water solution.
- Avoiding Harsh Chemicals: Avoid using abrasive cleaning agents or washing the car with a high-pressure hose.
- Inspecting the Film: Periodically inspect the film for any signs of wear or damage and address any issues promptly.
Important Takeaways
Protective film application is a valuable modification for any car, but especially for high-end models like BMWs. The techniques demonstrated, such as using an inflatable bladder, ensure a high-quality finish that protects the car's paint and maintains its aesthetic appeal. By following the proper steps and using the right tools, you can achieve a professional-looking result that enhances the overall value and longevity of your vehicle.
Conclusion
Modifying a car with protective film is a smart investment that pays off in the long run. Whether you're a DIY enthusiast or prefer professional installation, understanding the process and techniques involved can help you make informed decisions. By applying these tips and techniques, you can ensure that your BMW remains in pristine condition for years to come.
Watch the Reel
Questions readers ask
What are the benefits of applying a protective film to a BMW's hood and windshield?
Applying a protective film to a BMW's hood and windshield helps shield these areas from rock chips, bug splatter, and other debris. This protection helps to maintain the original paint, preserve the vehicle's appearance, and enhance its resale value. Additionally, it can prevent minor scratches from affecting the car's finish, ensuring a consistent and pristine look.
What tools do I need to apply a protective film to my BMW?
To apply a protective film to your BMW, you will need a few essential tools. These include a film application kit, which typically contains a squeegee, a spray bottle with a soap or adhesive solution, and a sharp knife or razor for trimming the film. Additionally, you may need microfiber towels and a heat gun to help mold the film to the car's contours.
Can I apply a protective film to my BMW's hood and windshield myself, or should I hire a professional?
You can certainly apply a protective film to your BMW's hood and windshield yourself with the right tools and guidance, as outlined in detailed application guides. However, for the best results, especially on complex surfaces, you might want to consider hiring a professional. Their experience can ensure a flawless finish and prevent common issues like bubbles or wrinkles.
How long does it take for a protective film to cure after application?
The curing process for a protective film typically takes about 48-72 hours. During this time, it's important to avoid washing the car or exposing it to harsh weather conditions. This allows the adhesive to fully bond with the paint, ensuring a strong and durable hold. Some films may have a faster curing time, so it's always a good idea to check the manufacturer's specifications.
How do I maintain a protective film on my BMW after application?
Maintaining a protective film on your BMW involves regular cleaning and careful handling. Use a gentle car wash soap and avoid abrasive materials that could scratch the film. Additionally, periodically inspect the film for any signs of lifting or damage. If you notice any issues, address them promptly to prevent further damage to the paint underneath.
What should I do if I notice bubbles or wrinkles in the protective film after application?
If you notice bubbles or wrinkles in the protective film, you can often resolve these issues by using a heat gun and a squeegee. Gently apply heat to the affected area to soften the adhesive, then use the squeegee to smooth out the film. Work from the center of the bubble or wrinkle outward to ensure a smooth finish. If the problem persists, you may need to remove the film and reapply it.
Is it necessary to remove the protective film before detailing the car?
No, it is not necessary to remove the protective film before detailing the car. In fact, a good quality protective film can help enhance the gloss and shine of the car's paint and make detailing easier. Just ensure you use car wash products that are compatible with the film and avoid any abrasive materials that could damage it. Always check the manufacturer's recommendations for cleaning and maintenance.
Related deep dives
Similar reads based on topic and creator.

Recent articles
Fresh deep dives from the latest Reels we unpacked.

Comments
Be the first to comment.